Tuesday 20 July 2010

Celebrating Summer: Strawberry Cupcakes

A couple of weeks ago, I went to meet up with my friend Looby after her job interview. She was sitting in the temple that is Starbucks (I am so clichéd, ugh), drinking a hot chocolate and eating a strawberry cupcake. She said ‘the cake is ok, but try the icing’. She was right. The cake itself tasted like shop cake; just a basic and sadly bland vanilla. The butter cream icing however was made with real strawberries, and was really something. It had the little strawberry pips dotted through it, giving it this adorable, rustic look, whilst being pristinely piped.

I wanted to make my own!

So I scoured the internet, and found a recipe that suited on cooksunited.co.uk. The whole first batch I made with this recipe I threw out for the birds (see this post), which was a real shame, as that’s a hideous waste of materials. However, second time around, I ended up with some pastel pink, aromatic and incredibly light cupcakes. And the frosting… stuff you Starbucks, I can do better at home!

I had to mess the recipe about a bit, mainly with the cooking times and temps, and it is one I want to mess around with more, but this is what I did for the firstrun. Apologies now, and always, for my hideous food photography.


Strawberry Cupcakes
Makes 12-16, depending on how big you make your cuppies.

For the cakes:

100g fresh local strawberries, hulled and halved
1sp baking powder
180g flour
60ml milk
120g butter (salted or unsalted, depending on your preference)
200g golden granulated or caster sugar
1 large free range egg
2 large free range egg whites
1sp vanilla extract (not essence; you’ll thank me)

Preheat your oven to 170/150 fan assisted. Line your muffin pan with paper cases, or, if you are like me, line a baking tray with silicone cupcake cases.

In a blender, puree the strawberries. Try not to glug the delicious fruity goop down on its own. Be strong. Set it aside.

Combine flour and baking powder in a mixing bowl. Set aside.

With an electric mixer (hand or processor) cream the butter until fluffy and pale, then gradually add the sugar and continue to mix.


Add one egg and mix thoroughly.

Separate off your egg whites. Add them to the mix with the vanilla and blend/beat well until the mixture is well aerated and uniform.

Combine the strawberry puree with the milk. Marvel at your milkshake of awesomeness, but do try not to drink it. Add the ’milkshake’ into the wet mixture, mixing well.

Combine the wet mixture into the dry flour mixture about half and a time. Be careful not to beat too hard; you want to preserve the air in the mix fro
m the egg beating. Continue until mixture is even in colour (pale, pretty pink) and texture.

Spoon out your mixture into your prepared cupcake baking receptacle(s). I made mine quite small, so it worked out to be enough batter for 16. The recipe is meant for 12 good sized cupcakes.

Bake for 15-18 minutes. Mine were a little more well done than I would have liked (I baked for 18), despite taking 7 minutes off the original baking time. If you are baking 12 large cupcakes rather than my 16, 18-20 minutes should be plenty. When done, the outsides will be prettily golden (darker if like me you use unrefined sugars), the insides fluffy and pink.

Allow to cool in pan/on tray for about 5 minutes, before removing to a cooling rack. Mine fell out of their silicone cases with ease at this stage.


For the butter cream and decoration:


Strawberry Buttercream

50g fresh local strawberries, hulled and halved
250g butter
400g icing sugar
50g golden caster sugar (can replaced with icing sugar)
1 sp vanilla extract
Optional: decorations like sugar pearls, dragees, confectioner’s glitter, glitter sugar etc etc

While the cakes are cooling, make your butter cream. Puree 50g of fresh hulled and halved strawberries in a blender. Alternatively, blend them when you do the 100g for the cakes, and remove a third and set to one side.

In an electric mixer, or by hand if you are tough and awesome, cream 250g butter until fluffy.

Add the sugar(s) and blend well.


When the butter cream is beginning to come together, add the vanilla and strawberry puree, and watch the buttery mix turn into pure pink paradise.

When the cakes are cool, ice as you like with the butter cream (I *attempted* to pipe mine) and decorate as you will. I made mine as blousy and ridiculous as possible, and I think they looked soooo cute.


Due to the fresh fruit content, these will keep for longer and keep better in the fridge. They taste best within 1-2 days of baking.

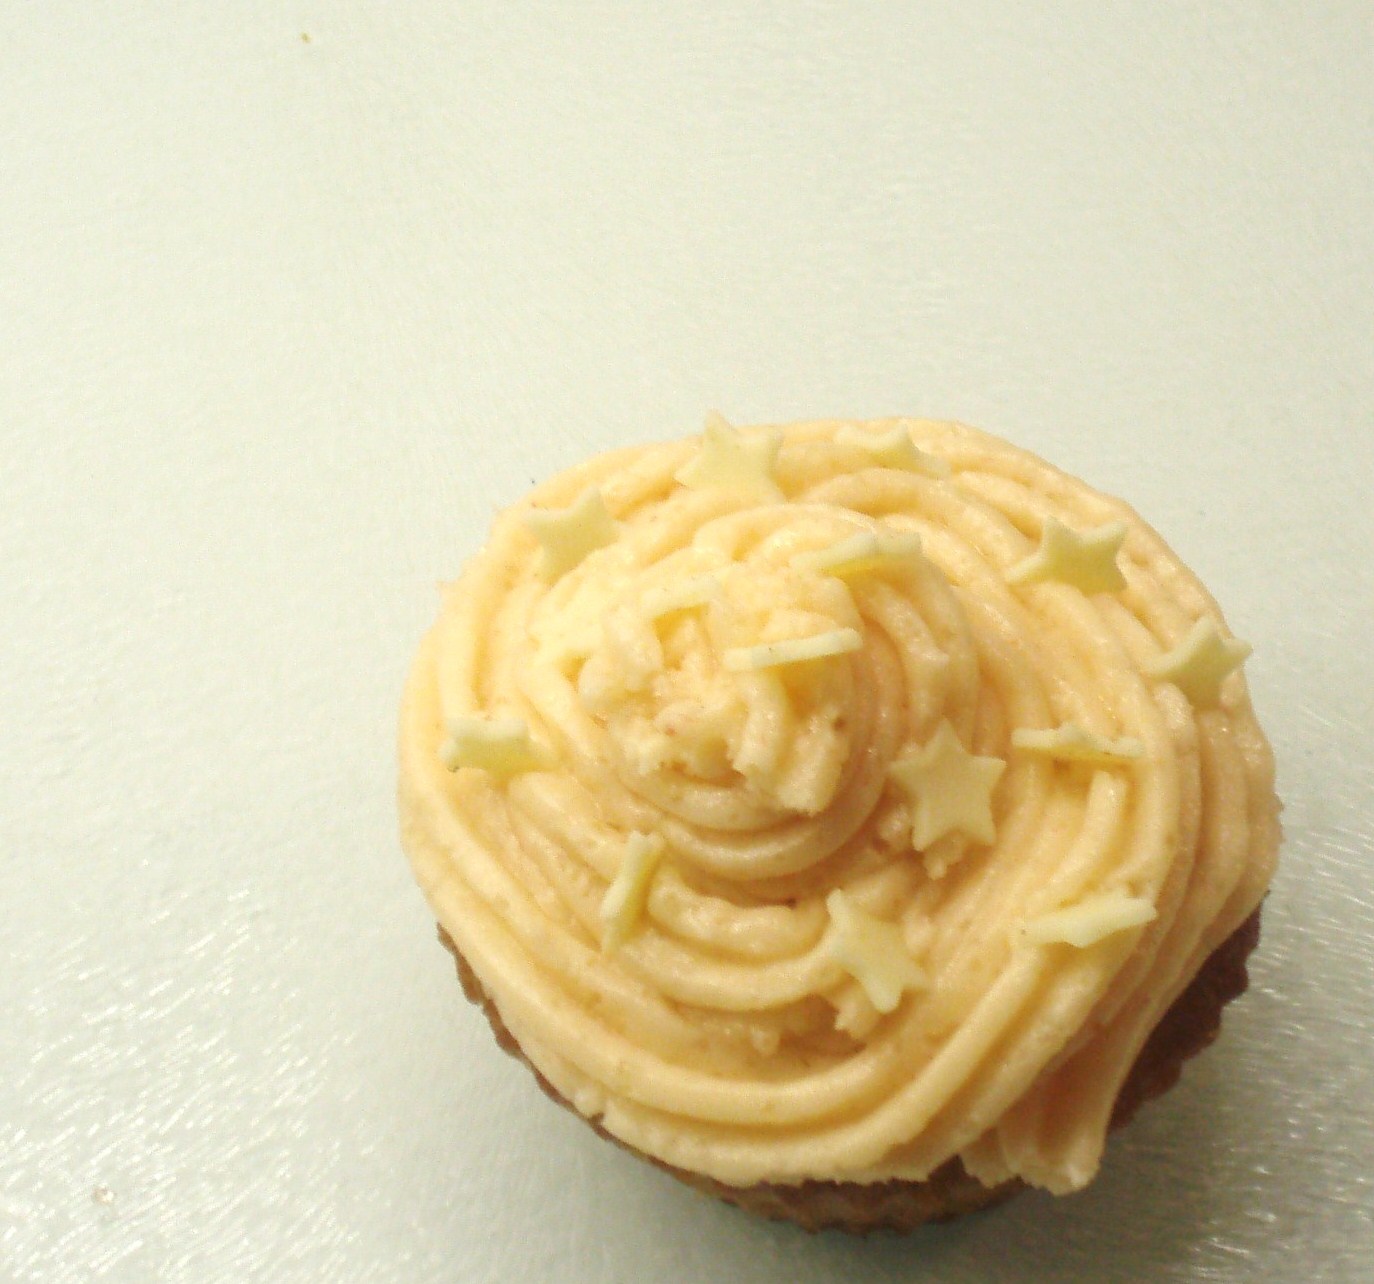
This little cutie, decorated with white chocolate stars, is probably one of my two favourites out of the batch. If you can remember this recipe by any of the images here today, make it this one. Or perhaps the one of Looby in her darling hat. Though you may end up baking a darling hat. If so, send it to me, I want one.

When it came to decorating, my main issue is a) the butter cream was too cold because we’d had to refrigerate it when the first batch of cake failed. When I do this again (possibly later this week!) I will make the butter cream only when I am ready to use it. Also, I have a nasty neck injury from a car accident earlier in the year. I have numbness and muscle weakness in my arms, particularly the left, and I found it very difficult to pipe the not warm icing, and really quite painful. I‘d lost most of the sensation in the arm by the time I was done! I look forward to trying again with fresh, malleable icing. Also, I hate to blame my tools, but my piping bags are certainly not a grade, and I really do lack experience. This is probably my first time piping buttercream. Ah well, I can’t get worse!


This is the other of my favourites! I know, I know, how declassé of me to use hundreds and thousands... but it looked so sweet like that. Blousy, rustic and silly, too, but really quite lovely.

Regarding the caster sugar in the butter cream; I like my butter cream to have a bit of texture, and I was worried that the strawberry pips alone might make it a bit… well, bitty. So the I added the sugar to make the texture more uniform, and I think it worked quite well. I will try it with just icing sugar too.

I’m pondering tweaking the recipe to include white chocolate. I thought the one we decorated with white chocolate stars looked really sweet. And I love the combination of white chocolate and strawberry. Perhaps making the topping a strawberry ganache instead, or little white chocolate pieces in the cake. I’m not sure about the latter, as they were so incredibly light and moist, due to the egg whites (the lightness) and the fairly large liquid content (milk, strawberry puree). I kind of don’t want to mess with the texture.

The Looby 'cupcake and tea' seal of approval!

I wish they had tasted MORE of strawberry though. The taste was definitely there, but it was a delicate and natural flavour, easily lost in the rich butter cream. I was a bit under whelmed by the butter cream to be honest, because it overwhelmed the cake, and it was really too rich and sweet, which coming from a sweetness fiend is saying something. I think that is the main thing I will look at changing when I make these again; Looby suggested cream cheese icing, but this might be because she loves cream cheese icing, rather than it being a good flavour match. I think it would be too sour. As I said before, I am looking forward to playing with this recipe again and again, and it has the potential to be so light and pleasantly sweet and summery, I can see it becoming a staple around here.

Thursday 15 July 2010

LFMF: Salty Seadogs

I have never really understood why anyone would put salt in a confection. Salt liquorice excluded. And salted caramel. And sea salt ice cream for all you squeenix-ites out there.

What I am talking about is salt in cakes, biscuits, brownies etc. I don’t understand it. Why?

I grew up in a no salt household. My grandmother has a heart condition, and so my mother grew up learning to cook without salt. So when she passed the torch to me, naturally, I cook without salt. Now I am mostly grown, I love a little tiny pinchette of salt in the water when I boil wholegrain rice, or the occasional sprinkle on chips (though I much prefer cracked black pepper and Mediterranean herbs, a num num num). Salty takeaways are a rare and delicious treat. However, on the whole, I still cook without salt. I still live without salt.

I found a new recipe I wanted to try a couple of days ago, on Cooksunited.co.uk (I will post about the less fail version soon). The recipe called for 2 ½ tsp of salt in a cupcake batter. I’m a great believer in baking being alchemy, and I’m a gullible fool who doesn’t really know how strong salt is, so I merrily mixed it into the flour, and got on with the rest of the baking procedure. It was, whilst not difficult or really complicated, an involved recipe, so by the time I was mixing the wet with the dry, I had forgotten about that 2 ½ tsp of salt I had mixed in. So when I had popped the first half-batch into the oven, I tasted a bit of the batter.

BLECH. It was like strawberry scented sea water.

Baking didn’t improve it. Delicious frosting didn’t improve it. There was nothing for it.

These cupcakes were fail!cakes.


Seriously. Utter fail.


Don’t pity them. They brought it on themselves. They had the audacity to smell delicious too. *weeps*

I followed the recipe to the letter, and alas, fail occurred. I have little doubt that it’s happened to every baker worth his or her flour streaked hair in their time. In fact this one was a multi!fail. The cook temp was too high for my oven, even when I had factored in fan assistance and a little for the fact my oven appears to be powered by THE FIRES OF HELL. Also, the cook time was too long, and of course, as afore mentioned, the poor beleaguered cupcakes tasted like undiluted miso and my perfume.

What can we all take away from this fail?

Generally;

1) Be prepared to fail at baking from time to time. No one gets it absolutely right every time. For serious.

2) Baking might be alchemy, but there’s always more than one way to skin a cat. Be prepared to edit recipes pre bake, based on common sense and experience.

3) Practice makes perfect. Never expect perfection from your first try at a recipe; give yourself time and ingredients to try again before it’s needed, if necessary.


And specifically, regarding salt;

Maybe I’m a heathen. Maybe I should be butchered in my bed for suggesting this, but I don’t think you don’t NEED, in my albeit limited experience, to put salt in nearly all sweet recipes. And most savoury ones too. It’s better for your health, for one. At most, a little sprinkle of sea or table salt is more than enough.

If you need to use salt, or want to, table salt has a much stronger flavour, and a much more ‘manufactured’ taste compared with sea salt. I wouldn’t use more than the minute-est sprinklette of the former in any sweet recipe, as it is even quicker to over power.

My top tip for getting around the risk of over salting, whilst using salt, is to use salted butter. Cut the salt out of the dry ingredients of the recipe all together. Salt is a taste enhancer; I’m led to believe its contrast with the sweet in the confection makes the flavours really pop. Unless you are making salted caramels or sea salt ice cream, lightly salted butter will give you that edge of balance whilst stopping the salt content from getting too high and too cloying on the palate.

But, to be honest, heathen though I may be, just don’t bother. Save it for your tatties.

Well, I’d best go and start writing up the slightly more successful version of the cupcake story. And see if the local wildlife fancies a salty sweet snack…

Please guys. Learn from my salty fail.

Tuesday 13 July 2010

Bare Cupboard Brownies

This recipe for brownies used to be my favourite, until I discovered my sinful brownies recipe (which I will share with you soon, I promise). Still, it has its merits, and the result is proper tasty. These are my chosen ‘brother bribes’ when he’s got a grump on. I baked about four batches of these last Christmas, and they promptly vanished! They were the first recipe for brownies that even sort of worked for me; for some reason brownies always seemed to explode in my oven… until I made peace with this recipe. Baking is alchemy. Sometimes alchemy goes awry. That anime they made? Actually a jazzed up version of my kitchen disasters. *Shudders* Those were some ugly brownie homunculi…

Anyway, back to the Bare Cupboard Brownies. I call them that because, quite simply, they are my go to recipe when I don’t have time or money to go out and splurge on a pound of 70% cocoa, fairtrade deliciousness, and all I have are the basics. There is nothing in this recipe that does not live in my baking cupboard or fridge anyway. This is the Spanish Omelette of the brownie world. They aren’t made with chocolate, which will make many bakers cringe, rather a healthy amount of unsweetened cocoa powder. Even so, you end up with fudgy, dense deliciousness at the end. Yum.


Ingredients:

140g Butter
250g Golden caster sugar
75g Unsweetened cocoa
Small pinch of salt (optional, or you can use salted butter)
1 tsp Vanilla extract (Don’t use essence, please. Think of your taste buds.)
2 Large free-range eggs
125g Plain flour
Optional: chocolate chips/chopped nuts/fudge pieces

Line a brownie pan, or, as I do, a 9 inch square cake tin with tin foil. Preheat your oven to no more than 160/ or 140 fan assisted.

Set a glass or steel bowl over a pan of simmering water. Combine the butter, cocoa, sugar and salt over the heat until the butter has melted and the mixture is glossy and even. Remove from heat.

Once cooled a little (don’t let the mixture go cold. The mixture needs to be pretty warm still, just not hot enough to curdle the eggs) beat in the eggs and vanilla.

Stir in the flour until the mixture is a uniform fudgy stickiness. At this stage add any optional extras and mix thoroughly.

Pour/spoon the mixture into the tin. The mixture is quite doughy so I usually even it out and push it into the corners with my fingers.

Bake for 22-25 minutes. The brownies are done when a skewer plunged into the middle comes out mostly clean. Set aside the cool. Once cool, chop up into the desired sized pieces.


These brownies, as with most I think, taste great when they are fresh, but freaking amazing if left to age overnight in an airtight container. They’re good for at least a week if kept cool and airtight. They are really very tasty, though despite much tweaking they will never be proper real chocolate brownies. They’re excellent iced (I’m such a heathen) or naked as the day they were baked.


Gosh I’m hungry.


On being a better baker

First post! Ololol!

Enough of that. I rather suppose I had better introduce myself.

My name is Natasha. I'm a twenty-something year old writer, baker, rat wrangler, unicorn protection specialist, dreamer etc based in north west Kent, UK. I have a serious sweet tooth and a passion for creating, whether that be the written word, mediocre artwork, or generally rustic and magically delicious cakes and confections. My dream is to own a chocolate tempering machine. And perhaps, you know, have enough money to live on. And world peace. And stuff.

The reason for creating this blog is mainly a selfish venture. I love to write and I love to bake, and any combination of the two is rather like mustard and roast beef, cheese and chocolate, peas and barbeque sauce; self indulgent and utterly perfect to me. Being that I am, like most graduates since 2008, perpetually looking for work or only working part time, I have plenty of time (and not always enough money, sob) to indulge my hobbies.

I pondered holding off creating this blog until Christmas, as December is like my NaNoWriMo for baking; lebkuchen, cranberry sauce, sugar cookies, brownies, mincemeats various, cakes, yule logs, mince pies, peppermint concoctions and pretty much anything and everything else, every day, for 24 days. phew. However there is no time like the present, and since summer is party season, I've been busy bakering and, you know, fattening up my friends. It makes me feel good about myself. Ohohoho.

I'll be posting recipes I'm enjoying or ones I've tweaked to what I consider perfection, as well Learn From My Fail photos and anecdotes. As the blog title suggests; I have a long way to go in the world of baking.

Hope to see you all around. Later Days!

Nx